안드로이드 앱 프레임워크 학습(WindowManager) 1 (tistory.com)
안드로이드 앱 프레임워크 학습(WindowManager) 1
안드로이드 그래픽스 프레임워크 학습 2 (tistory.com) 안드로이드 그래픽스 프레임워크 학습 2 안드로이드 그래픽스 프레임워크 학습 1 (tistory.com) 안드로이드 그래픽스 프레임워크 학습 1 이번에
nyaang.tistory.com
지난 블로그에서는 CreateLayer를 어떻게 불러주는 지에 대해서 확인을 했었습니다
이번에는 WindowManager에 관해서 좀 제대로 알아보려고 합니다
WindowManagerService 생성
// SystemServer::startOtherServices
            wm = WindowManagerService.main(context, inputManager, !mFirstBoot, mOnlyCore,
                    new PhoneWindowManager(), mActivityManagerService.mActivityTaskManager);
            ServiceManager.addService(Context.WINDOW_SERVICE, wm, /* allowIsolated= */ false,
                    DUMP_FLAG_PRIORITY_CRITICAL | DUMP_FLAG_PROTO);

// WindowManagerService::main
    public static WindowManagerService main(final Context context, final InputManagerService im,
            final boolean showBootMsgs, final boolean onlyCore, WindowManagerPolicy policy,
            ActivityTaskManagerService atm, DisplayWindowSettingsProvider
            displayWindowSettingsProvider, Supplier<SurfaceControl.Transaction> transactionFactory,
            Supplier<Surface> surfaceFactory,
            Function<SurfaceSession, SurfaceControl.Builder> surfaceControlFactory) {
        DisplayThread.getHandler().runWithScissors(() ->
                sInstance = new WindowManagerService(context, im, showBootMsgs, onlyCore, policy,
                        atm, displayWindowSettingsProvider, transactionFactory, surfaceFactory,
                        surfaceControlFactory), 0);
        return sInstance;
    }
먼저 WindowManager가 시작되는 위치는 SystemServer의 startOtherServies가 불릴 때 이며,
그 때 ServiceManager에도 등록이 되어 아래 처럼 받아 쓸 수 있습니다
context.getSystemService(Context.WINDOW_SERVICE) as WindowManager
단 WindowManager의 실제 구현은 WindowManagerImpl에 코드가 있으며, WindowManagerService를 wrapping 해놓은 식입니다
// WindowManager
@SystemService(Context.WINDOW_SERVICE)
public interface WindowManager extends ViewManager {
...

// WindowManagerImpl
public final class WindowManagerImpl implements WindowManager {
    @UnsupportedAppUsage
    private final WindowManagerGlobal mGlobal = WindowManagerGlobal.getInstance();


    ...

    @Override
    public void setShouldShowWithInsecureKeyguard(int displayId, boolean shouldShow) {
        try {
            WindowManagerGlobal.getWindowManagerService()   // windowManagerService
                    .setShouldShowWithInsecureKeyguard(displayId, shouldShow);
        } catch (RemoteException e) {
        }
    }


// WindowManagerGlobal::getWindowManagerService
    @UnsupportedAppUsage
    public static IWindowManager getWindowManagerService() {
        synchronized (WindowManagerGlobal.class) {
            if (sWindowManagerService == null) {
                sWindowManagerService = IWindowManager.Stub.asInterface(
                        ServiceManager.getService("window"));
                try {
                    if (sWindowManagerService != null) {
                        ValueAnimator.setDurationScale(
                                sWindowManagerService.getCurrentAnimatorScale());
                        sUseBLASTAdapter = sWindowManagerService.useBLAST();
                    }
                } catch (RemoteException e) {
                    throw e.rethrowFromSystemServer();
                }
            }
            return sWindowManagerService;
        }
    }
Window 관련 ClassDiagram

실제로는 이것보다 훨씬 복잡하지만 일단 이렇게만 먼저 보겠습니다
지난 번 안드로이드 앱 프레임워크 학습(WindowManager) 1에서 WindowManager는 window 단위로 관리를 한다고 했지만 사실 엄밀히 말하면 WindowState단위로 관리가 됩니다
PhoneWindow의 경우 여러 경우가 있지만, 간단히 생각하면 Activity에서 getWindow 할 때 불리는 Window이며,
Activity에서 setContentView를 호출해줄 때 사용되는 View가 PhoneWindow입니다
이건 다음에 다시 한 번 정리를 하겠습니다
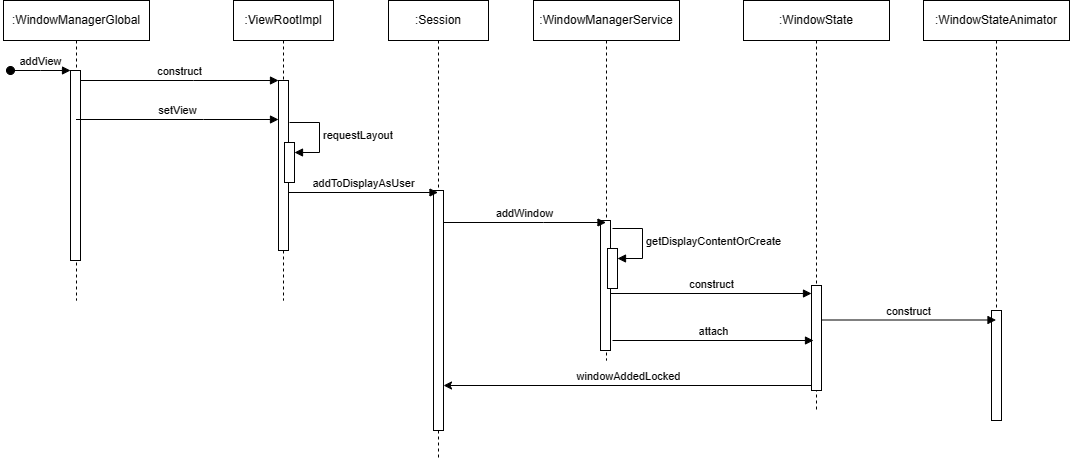
아무튼 Activity를 사용하지 않고, 화면에 띄우기 위해 WindowManager에 addView를 호출해주는 상황의 sequence을 보면
// WindowManagerGlobal::addView
root = new ViewRootImpl(view.getContext(), display);

// ViewRootImpl 생성자
    public ViewRootImpl(Context context, Display display) {
        this(context, display, WindowManagerGlobal.getWindowSession(),
                false /* useSfChoreographer */);
    }
WindowManagerGlobal에 받은 View를 저장하고, ViewRootImpl을 만들어 받은 View와 Session을 set해줍니다
// ViewRootImpl::setView
res = mWindowSession.addToDisplayAsUser(mWindow, mWindowAttributes,
        getHostVisibility(), mDisplay.getDisplayId(), userId,
        mInsetsController.getRequestedVisibilities(), inputChannel, mTempInsets,
        mTempControls);

// Session::addToDisplayAsUser
    @Override
    public int addToDisplayAsUser(IWindow window, WindowManager.LayoutParams attrs,
            int viewVisibility, int displayId, int userId, InsetsVisibilities requestedVisibilities,
            InputChannel outInputChannel, InsetsState outInsetsState,
            InsetsSourceControl[] outActiveControls) {
        return mService.addWindow(this, window, attrs, viewVisibility, displayId, userId,
                requestedVisibilities, outInputChannel, outInsetsState, outActiveControls);
    }
ViewRootImpl에서는 받은 session에 addToDisplayAsUser를 호출해주고,
결국 이것은 WindowManagerService의 addWindow를 호출을 해줍니다
// WindowManagerService::addWindow
            final DisplayContent displayContent = getDisplayContentOrCreate(displayId, attrs.token);

			...

            WindowToken token = displayContent.getWindowToken(
                    hasParent ? parentWindow.mAttrs.token : attrs.token);

            // token이 없으면 만들어줍니다

            final WindowState win = new WindowState(this, session, client, token, parentWindow,
                    appOp[0], attrs, viewVisibility, session.mUid, userId,
                    session.mCanAddInternalSystemWindow);


  ...

            win.attach();
            mWindowMap.put(client.asBinder(), win);


          ...

            final WindowStateAnimator winAnimator = win.mWinAnimator;
            winAnimator.mEnterAnimationPending = true;
            winAnimator.mEnteringAnimation = true;
이것을 sequence diagram으로 표현한 것이 아래입니다
사실 위의 diagram에서 ViewRootImpl내의 requestLayout시점에 performTraversal을 통해
// ViewRootImpl::performTraversal
    private void performTraversals() {
    ...

                relayoutResult = relayoutWindow(params, viewVisibility, insetsPending);

    ...
relayoutWindow를 호출해주고 타고 타고 가면, windowManager의 relayoutWindow를 호출 해줍니다
// WindowMangerService::relayoutWindow
// Create surfaceControl before surface placement otherwise layout will be skipped
// (because WS.isGoneForLayout() is true when there is no surface.
if (shouldRelayout) {
    try {
        result = createSurfaceControl(outSurfaceControl, result, win, winAnimator);
    } catch (Exception e) {
        displayContent.getInputMonitor().updateInputWindowsLw(true /*force*/);

        ProtoLog.w(WM_ERROR,
                "Exception thrown when creating surface for client %s (%s). %s",
                client, win.mAttrs.getTitle(), e);
        Binder.restoreCallingIdentity(origId);
        return 0;
    }
}

// We may be deferring layout passes at the moment, but since the client is interested
// in the new out values right now we need to force a layout.
mWindowPlacerLocked.performSurfacePlacement(true /* force */);
사실 이 과정도 꽤 복잡하고, 이 과정들로 인해서 SurfaceFlinger에서 사용되는 layer를 SurfaceControl transaction을 통해 업데이트를 해주는 과정이 일어나게 되는데, 이건 relayout 과정으로 3편에서 따로 분리하여 좀 더 보도록 하겠습니다
감사합니다!
'안드로이드 > 안드로이드 프레임워크' 카테고리의 다른 글
| 안드로이드 앱 프레임워크 학습(ActivityManager) 1 (0) | 2024.03.01 |
|---|---|
| 안드로이드 앱 프레임워크 학습(WindowManager) 3 (0) | 2024.03.01 |
| 안드로이드 앱 프레임워크 학습(WindowManager) 1 (1) | 2024.02.28 |
| 안드로이드 미디어 프레임워크(SurfaceFlinger) 학습 3 (0) | 2024.02.27 |
| 안드로이드 미디어 프레임워크(SurfaceFlinger) 학습 2 (0) | 2024.02.25 |